Managing Your Emails Better with Gmail
May 18, 2013
Will WordPress Work for You?
August 6, 2013Our email accounts often get cluttered up with stuff we don’t want, whether it’s annoying marketing emails, chain letters, or just spam. If you want to be able to find your emails fast, it’s important to keep our emails organized. Fortunately, learning some of Gmail’s features is easy to do and it will save you a ton of time in the future!
(Note: This blog post is specifically about Gmail, but there will be other features that are very similar whether you’re using Yahoo, Hotmail, or etc.)
Search
First thing’s first, one of the most powerful and easy to use features of Gmail is often overlooked by Gmail newcomers – there is a search bar at the top of your Inbox that you can use to look for previous emails. You can search for anything in your Inbox, Sent, Deleted, etc, folders. Try it out with different keywords.
You can also click the downward arrow on the right side of the search bar to see Advanced Search Options; here you can specify who the email might have been from, what words it contained, and etc.
Deleting and Archiving Your Email
Now that we know about searching through our emails with ease, let’s talk about what we want to do with our email when we’re done with it.
When you delete your email, it moves the mail into the Trash. All you have to do to delete an email from your Inbox is click on the empty box to the very left of your email – that’s a checkbox. Then you can click on the Trash icon near the top of the page. To delete emails permanently, you can go into the Trash folder and do the same thing. In the picture below, I’ve circled the Trash icon.
Note how you can select multiple emails using this checkmark method – this makes it very easy to delete or modify multiple emails at once.
A second option is to archive your emails rather than Delete. You can think of archiving your email as moving it into a file cabinet rather than the trash can. To do that, we use the same method as deleting, but we click the archive button instead. Now, that email is located inside your All Mail folder, which you can access on the left side of the page. In the picture below, the Archive button is on the left.
Lastly, one thing that you might consider is that you don’t have to delete your unwanted emails – you can leave them sitting in the inbox. At the time of writing this, Gmail gives you 10.1 gigabytes of storage for your email. Even with emails that have hefty attachments, that is a lot of storage and will last you a long, long time. But for those of us who want to stay more organized, it’s easy!
Moving Your Email Where You Want It (Labels and Filters)
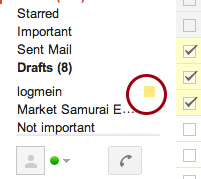
Gmail makes it very easy to apply labels to your email. Labels are a way of marking certain emails for your convenience and also for organizing your emails so that you have quick access to them. In the picture below, you can see the yellow label I’ve made for myself.
For instance, you might have a label for Work, and a label for Family emails. When you have a Label, it shows up on your emails and also on the side of the page (along with Inbox, Sent, etc folders) to make things convenient.
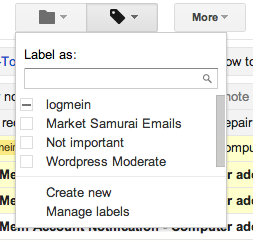
Time to make a label and apply it to a few emails. First, check one or more emails like we did in the delete section, and then press the Labels icon. (See the picture below!) You’ll see that your cursor is automatically in new box titled “Label As:”. Start typing a name for your label (for instance, “Work”), and then press “create new” right below where you’re typing. The New Label window comes up – click Create and you’ve made a Label!
You can change the color of the label. Look on the left side of the page for your label (you may have to click the Down arrow to expand your options), hover your mouse over you label, and a box will appear on the right side. Click on it and select a color. Check out the picture below to see that.
So now you can visually organize your email by labels. How neat! But what if we want to automatically make some emails a certain label? You can do that with Filters. This is where Gmail’s power really comes in handy.
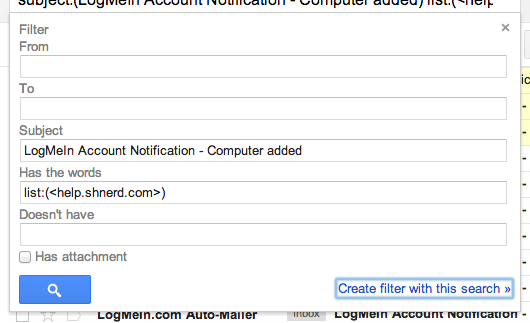
To make a filter, check a few of your emails that you would like to filter (the labeled ones you just made will work fine), and this time click on “More” at the top. You should see an option for “Filter Messages Like These.” Click on that, and a new window will pop up — it should look like the one below.
If you’ve selected your emails, that window will already be filled out as above. Now, click the “Create filter with this search” link , and here’s where we can tell Gmail what to do with emails like this when we receive them. We have a few options:
• Skip the Inbox (Archive it) — this goes straight to All Mail
• Mark as read — It will be grayed out as if you already had opened it
• Star it — This places a star beside the email
• Apply the label: (label) — This applies a label directly
• Forward it — this will automatically forward it to a certain address
• Delete it — send straight to trash
• Never send it to Spam –— make sure Gmail knows it’s not spam
• Always mark it as important — these last two options can mark it as important or not important
• Never mark it as important
Select what you want (for instance, you could do Apply Label: Work and Star it at the same time), click Create filter, and Gmail will automate it for you!
Don’t forget to select the “Also apply filter to __ matching messages” – this will retroactively apply the filter to all of the messages.
And that’s it! If you have any questions, please feel free to contact Neighborhood Nerds and we will be happy to help you out.


